“A picture is worth a thousand words.”
It’s a famous saying, but is it true? The answer probably depends on the quality of the picture. Quality pictures usually have four common traits with a clear subject, good composition, good exposure, and high resolution. To clarify what I mean, a blurry, grainy picture of your dog may not be photobook quality. Don’t worry, with practice it’s relatively easy to take good pictures. While the resolution of your picture is determined by the capabilities of your camera, it also takes practice to achieve good composition, good focus, and optimum exposure. If you’re new to photography, this blog will help you understand the basics and give you some pointers on how to take better photographs. If you’re already familiar with the basics, this blog will also cover more advanced techniques as we go along.
March 2016 – Macro Photography
Macro photography uses special lenses to allow the photographer to take pictures very close to the subject in order to capture very fine details. Most photographers should get at least a little experience with general purpose lenses and photo composition before considering getting a macro lens.
One suggestion I have for photographers looking into purchasing a macro lens is to make sure their cameras have a subject tracking focus mode. For Nikon, the feature is called 3-D focus tracking and for Canon it is called AI Servo Autofocus. This mode causes the camera to keep its focus on a moving subject. When shooting macro photography outdoors, many subjects like insects or plants may move, either on their own or with the wind. Without subject tracking it may be very difficult (but not impossible) to shoot clear images.
If you are considering macro photography, you should also consider purchasing an off-camera flash. While it may not be necessary in all situations, it will allow you to keep to lower ISO settings so as to avoid the graininess of high ISO pictures when there is low light.
Some other tips when shooting macro photography is to use a small aperture (f/11 – f/22) as the lens will have a narrower depth of field the closer you are to the subject. A shutter speed of 1/200 and an ISO of 100 is what I usually use along with a f/11 aperture. Using these settings, most macro shots will feature a dark (i.e. underexposed) background. If you want a brighter background, consider using different angles in which there is less distance between the subject and the background.
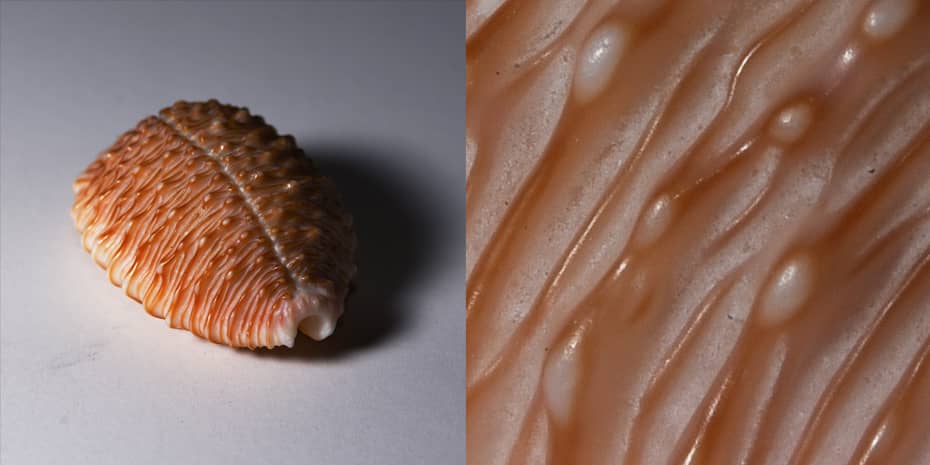
Macro photography opens up a whole new world of subjects. Some subject ideas include rocks, sea shells, and fabric to show texture, or plants, animals, and fine print (like that on money) to show detail. Here are some examples:


February 2016 – Shooting at Night
In my last post, I covered the basics of manual exposure and the control it gives you over your photos. Now that you know each function and how it affects the exposure, it’s time to learn night photography. If you still use a full auto setting, shooting at night will be difficult or impossible.
CRASH COURSE ON METERING
Before we jump into the shooting portion, I’ll teach you about metering as it will be very important in setting a custom exposure. Metering uses the camera’s light sensor to determine whether or not a shot would be over or underexposed. It is a good tool to know how to use when shooting manually. In lunar photography, you’ll want to intentionally use settings that will lead to underexposure so as to capture the moon or stars. Metering is indicated by a scale with a positive (+) icon indicating overexposure, a (0) for balanced exposure, and a negative (-) icon indicating underexposure. A set of bars or “ticks” on this scale indicates the exposure level at the current camera settings. If the bars extend toward the (-) icon, it means the photograph will be underexposed. If there are no bars visible, it means your settings will give you optimum exposure.

Right: Metering on right of LCD indicates proper exposure.

Right: Settings in viewfinder with metering indicating proper exposure.
NOW IT’S TIME TO SHOOT THE MOON!
A prime subject at night is the moon. Since the moon is often the largest visible object in the sky most DSLR lenses should be able to take a decent picture of it. I strongly recommend using lenses with focal lengths of 200mm-300mm as pictures will have more detail. The use of a tripod is recommended for steadiness and to free up your hands while you focus on the moon. Cameras that have a Live View mode, where the image in the viewfinder is displayed on the monitor, are great when used with the tripod as you can zoom in, manually focus on the subject (moon), and make any needed adjustments. The general settings to use for your exposure should have a low ISO (100 or 200), a medium-large Aperture (f/5.6), with a varying shutter speed (usually anywhere from 1/200-1/400 of a second). A good rule of thumb is when your camera’s metering says it’s two to four ticks underexposed. By keeping your ISO and Aperture the same, the only varying factor is shutter speed. When shooting the moon, a brighter picture looks more realistic, but a darker (underexposed) picture features more details. For best results find a setting that is in between the two.

STAR TRAILS
Unlike the moon, star trails require a long exposure and very little ambient light. Star trail photographs are best taken away from street lights and requires a tripod for stability. Similar to the moon, you’d want to use a low ISO, so that the sensor is not sensitive to surrounding light. The most crucial part is the shutter speed. For optimal star trails you may want to keep your shutter open for several minutes to an hour. Most cameras offer shutter speeds up to 30 seconds with a “Bulb” mode past that. Bulb mode allows for a custom shutter length as long as the release button is held down. You will need a shutter release switch for best results as any movement on the camera will affect the straightness of the trail. The longer the shutter is open, the longer the trail will be. However, if shooting for an extended period of time, artificial light will be more visible. Experiment with your shutter speed to get the look you want.

Right: Shot with a several minute exposure. Very pronounced star trails but has an orange tint from street lights nearby. The trails are not smooth due to slight movements on the tripod.
November 2015 – Manual Exposure
In my last post, I covered the basics of composition. In this post, I’ll cover manual exposure, which if mastered, allows you to take full control of your camera and the quality of the photos it produces. If you are shooting in the auto flash or no flash settings on a DSLR, you aren’t getting the most out of your camera. While using the automatic setting is easy, it doesn’t always guarantee you the best results, leaving the subject overexposed or underexposed. Using all auto functions may also lower or raise the shutter speed more than you want leaving pictures too static or slightly blurry.
The three settings on a camera that affect exposure are ISO, aperture, and shutter speed.
ISO
The ISO value controls the grain of the photo, and affects the amount of light that is absorbed by the camera sensor.. A low ISO (such as 100) creates clear and grain free pictures and is best used in bright outdoor settings. If a low ISO is used indoors without plenty of light, photos will be dark or underexposed. To solve this you can shoot at a higher ISO (such as 1600) for minimal grain and properly exposed photos. However, very high ISOs (such as 6400 to 12800) will produce very grainy pictures and so is best reserved for stargazing or other extremely low light situations.

High-Low ISO: The left picture has a high ISO while the right picture has a low ISO. The difference may not be very obvious, but if blown up the distinct noise can be seen more in the high ISO than the low ISO.

Up close, the left picture (high ISO) has visible grain compared to picture on the right (low ISO.)
APERTURE
Aperture refers to the size of the hole in the lens that allows light through. Apertures range from f/1 to f/64 but the sizes supported vary by lens. To check what size aperture your lens supports look on the barrel or on the front of the lens.

Here’s a Canon lens with the marking 55-250mm 1:4-5.6. The 55-200mm is the lens’ focal length. 1:4-5.6 means that at 55mm zoom the lens can go to a f/4 aperture and at 250mm the camera can go to f/5.6
Small f/stop: All flowers and leaves are clear, the building in the background has rigid lines and a reflection can be made out on the glass.

Large f/stop: Flower to the left is very clear along with the leaves at the same distance. The background and other flowers are blurry.
Most telephoto lenses (or “zoom” lenses) support f/3.5-f/5.6 which means at the shortest focal length, the maximum aperture is f/3.5 and when the lens is at its longest focal length, the maximum aperture is f/5.6. A large aperture (such as f/2.8) has a narrow depth of field which is useful to distinguish a subject from a group or background. It also allows for a faster shutter speed because a lot of light is allowed in at once. A small aperture (such as f/22) has a wider depth of field, and is great for landscape shots but requires lots of light to get optimum exposure.
Shutter Speed
The easiest function to understand is shutter speed. Shutter speed is the amount of time the sensor is momentarily exposed to light. Most DSLRs can shoot up to 1/8000 of a second, and features a “bulb” mode that allows a custom exposure for a long as the photographer wishes. Slow shutter speeds allow for motion blur, which if used correctly creates a fluid looking shot (like a flowing river). A fast shutter speed allows for stop motion shots, suitable for moving subjects like birds, planes, waves, and athletes.

Fast shutter speed: The picture is very static and the plants that are bobbing in the stream are still and clear. The waterfall has a rough texture to it.
Slow shutter speed: The water is silky, and the bubbles and objects in the water are blurry. The waterfall has a feathery texture to it.
September 2015 – Introduction to Photography
EQUIPMENT
Before you aspire to become a photographer, you should get a real camera, a device with the sole purpose of taking pictures. Sure, phone cameras are convenient but the quality of the photos they produce are typically of lower quality. Why are phone cameras not as good at shooting pictures as regular cameras? The answer lies in the size of the camera and its parts. Let’s put the iPhone 5’s tiny pinhead-sized camera under the microscope. The iPhone 5 has a 4.54 x 3.42 mm sensor, which is an average size for phone cameras but is dwarfed by any of the DSLRs produced by Nikon which have sensors that measure anywhere from 23.2mm x 15.4mm to 36mm x 23.9mm. The sensor is the part that converts the light reflected off a subject into a digital image and contributes heavily to image quality. Even the cheapest, entry level DSLR sold by Nikon—the D3200—has a sensor that measures 23.2 mm x 15.4 mm, which is about 23 times larger than the iPhone’s.
The DSLR remains best type of camera when it comes to image quality, functionality, and overall usability.
There are also point and shoot cameras which lie in between a phone and a DSLR. A standard point and shoot is better than a phone camera because it produces clearer and less grainy pictures. However, in most cases, point and shoot cameras aren’t as good as most DSLRs due to their smaller and cheaper parts. Another weakness point and shoots suffer from is their single lens construction. This doesn’t allow for lens changing, which can really make a difference when shooting subjects at a distance. However, camera manufacturers like Nikon have designed hybrid cameras that merge a DSLR’s functionality (namely, lens changing) with the small body of a point and shoot camera. Nikon calls this their Nikon 1 line.
Phones may be more useful in day-to-day life due to their countless other functions, but dedicated cameras have a well-deserved place in the realm of serious photography. Only in urgent situations should you turn to your phone if you own a camera. Standard point and shoots generate medium quality pictures and allow for custom settings. Mirrorless cameras (the hybrid point and shoots) are slightly better due to their interchangeable lenses, but the price tag isn’t too far off from an entry-level DSLR. The DSLR remains best type of camera when it comes to image quality, functionality, and overall usability. If you think you may pick up photography as a lasting hobby, an entry level DSLR is a great place to start.
COMPOSITION
To recap on what I covered earlier, there are four fundamental traits of a good photo. Let’s focus on composition to start. Most photos have a defined subject, whether it is a person, a building, or a car, unless it’s a vast landscape. There are certain things to keep in mind when shooting a defined subject. One of the most important aspects is subject placement. Depending on what you plan to use the picture for, a centered shot may not always be the best choice. If there’s more than one subject or you wish to incorporate background elements, the rule of thirds is a simple method that displays multiple objects fairly well. On most cameras, including some phone cameras, you can turn on a grid on the display that looks like this one below:

These lines divide the frame into thirds on both the x and y axis. Note the four points at which they intersect. The human eye is drawn towards these points so subjects placed along one or more of these points tend to be more visually appealing.
Here’s a good example of the rule of thirds.

The bee lies on the two left points and stands out.
Try applying the rule of thirds to your photography and see if your photos turn out nicer. Next week we’ll cover photo exposure which will take your skills up a notch.